
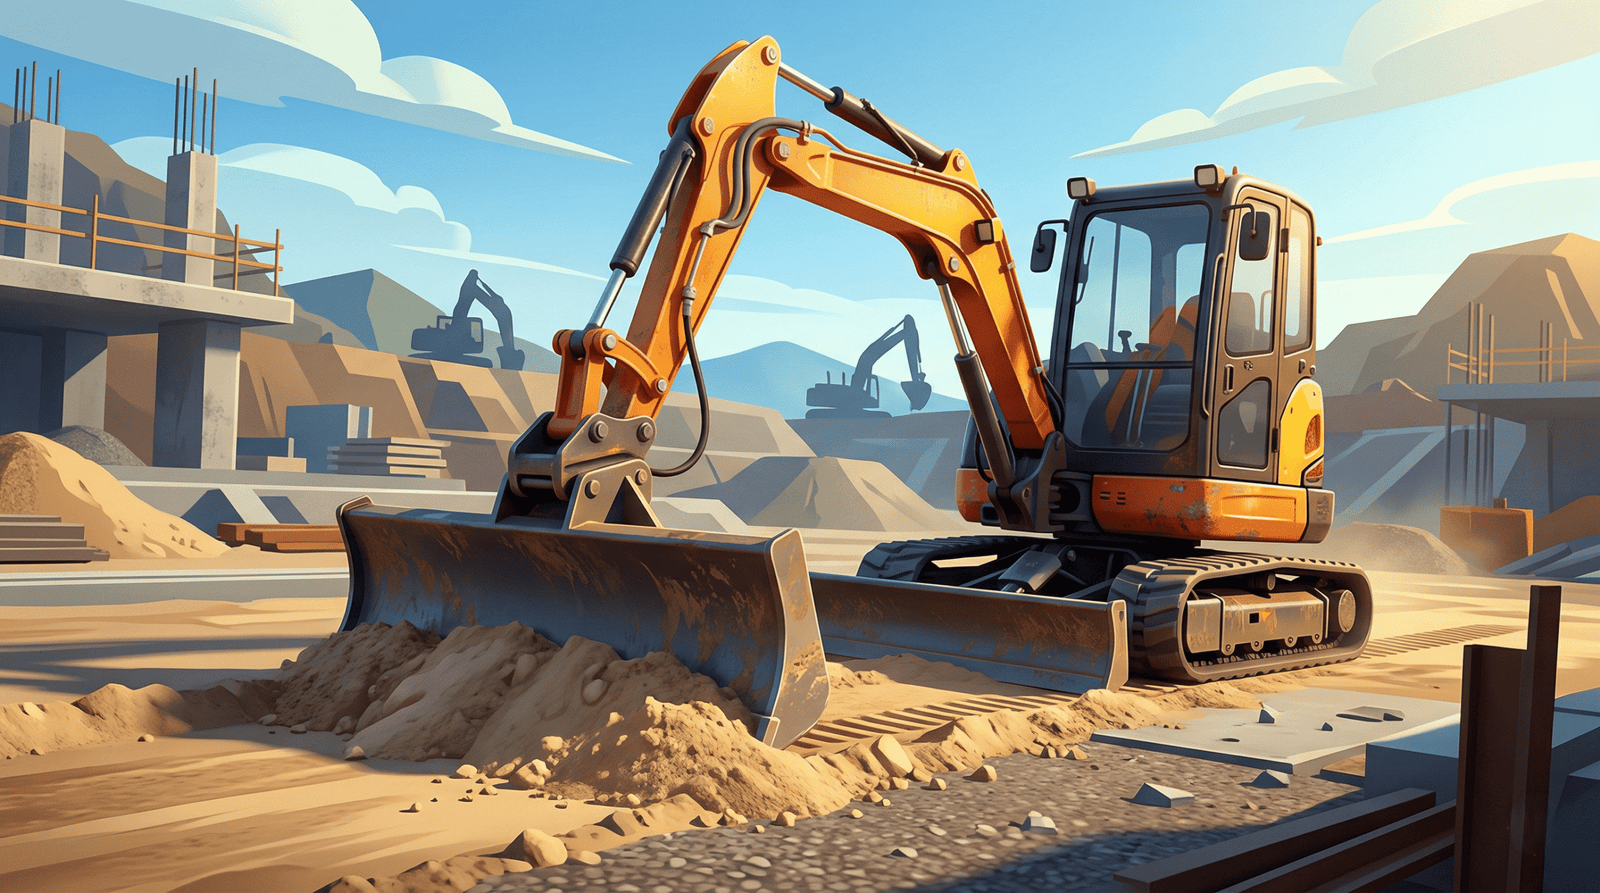
Blade Attachments for Mini Excavators: Making Backfilling and Leveling Easier
The development of compact equipment has completely changed the way construction works today. The small excavator is one of these machines that is quite versatile, especially when it is used with the correct blade attachments for mini excavators.
A lot of operators just think of these machines as digging tools at first, but with the right dozer or grading blade, a regular excavator may become a precise instrument for finishing, preparing a site, and managing trash.
If you work on home sites, utility trenches, or commercial landscaping, knowing how to use these accessories to make backfilling and leveling easier is the key to lowering labor costs and speeding up project completion times.
Blade attachments for small excavators may do a lot more than just keep them steady. In the past, getting a perfectly level slope or filling in a tiny trench required a lot of physical work or the use of a second equipment, such a skid steer.
Today, one modern mini excavator with a blade can do everything from the first dig to the last smoothing of the dirt. Combining chores not only saves gasoline, but it also leaves a smaller imprint on sensitive project sites, making sure that the earth stays undisturbed where it counts most.
How Dozer Blades Can Be Used in Small Construction
The dozer blade is usually the first thing that comes up when we talk about blade attachments for small excavators. This attachment is frequently permanently attached to the undercarriage, giving it a strong surface for pushing things and holding the vehicle steady during big lifts.
But current innovation has created detachable and highly movable versions that let operators do complicated grading duties with surgical accuracy. The major purpose of these blades is to move large amounts of material quickly while keeping the depth the same, which is important for the stability of the structure during backfilling.
- Standard Straight Blades: Great for moving large things and keeping the machine stable while it’s digging at full reach.
- Angle Blades: These let the operator angle the blade to the left or right, moving material to the side of the machine. This is great for side-casting when filling in a trench.
- Floating Capability: A lot of new systems include a “float” option that lets the blade follow the natural shape of the ground without the operator having to do anything.
Mastering Backfilling with the Help of Precision Blade Technology
Backfilling is more than simply putting dirt back in a hole; it’s about making sure that the soil is put back in a manner that prevents it from settling and eroding in the future. Using blade attachments on small excavators makes this job easier since they let the operator push uniform layers of dirt (lifts) into the trench.
An operator may drive next to a trench and “snowplow” the spoil pile back into the hole using an angle blade. This is far quicker than using a bucket to scoop and dump. This procedure makes sure that the material is spread out more evenly, which is the first step toward good compaction.
- Layered Backfilling: Use the blade to distribute dirt in layers that are 6 to 12 inches thick to keep the ground solid and able to hold weight.
- Less Moving: Angle blades make it less necessary to move the tracks all the time, which cuts down on wear and tear on the machine’s undercarriage.
- Curb and Gutter Protection: A tiny excavator blade can backfill right up to the margins of concrete without the danger of damage that comes with bigger loaders.
Getting the Right Grade: Leveling Made Easy
When you need to level a site for a new patio, driveway, or grass, blade attachments for mini excavators are the best. For a long time, final grading was done by hand with a “rake and shovel,” but now that 4-way and 6-way blades are available, the machine can do it with sub-inch precision.
These attachments let you tilt the blade to make crowns for drainage or cut into little slopes to make a level surface. The blade is the main “rough-in” tool when used with a grading bucket. It clears the way for the bucket to provide the ultimate, smooth finish.
- Crown Creation: To make a high point in the middle of a driveway, tilt and angle the blade so that water runs off to the sides.
- Site Stripping: Use the sharp edge of the blade to strip off tiny layers of sod or undesired topsoil without harming the sub-base.
- Constant Pressure: A small excavator blade’s hydraulic down-pressure lets it level hard-packed materials like gravel and crushed stone that hand tools can’t move.
Comparing Blades Attachments Types for Leveling Jobs
| Blade Type | Best Application | Movement Range | Accuracy Level |
| Straight Blade | Heavy Backfilling | Up / Down | Moderate |
| 4-Way Angle Blade | Trench Filling | Up / Down / Left / Right | High |
| 6-Way Power Blade | Fine Grading | Up / Down / Angle / Tilt | Professional |

New features of the blade: 4-Way vs. 6-Way Choices
The kind of blade attachments that mini excavators may use frequently depends on how hard the ground is to work on. A conventional 2-way blade (which simply moves up and down) is great for stabilizing things, but it doesn’t have the precision needed for complicated gardening.
A 4-way angle blade lets you rotate left and right, which is a big deal for backfilling. The 6-way blade, on the other hand, is the best since it can also tilt. This lets the operator cut a V-ditch or make up for the fact that the machine is on an uneven slope. This keeps the blade level with the horizon, even if the rails aren’t.
- Hydraulic Tilt: This lets the operator cut deeper on one side, which is very important for ditching and drainage operations.
- Independent Controls: New joysticks let the boom and the blade move at the same time, which makes the task go more smoothly.
- Bolt-On Cutting Edges: Many high-quality blades include edges that can be replaced, which makes the attachment last longer and keeps it sharp for digging into the ground.
Getting the most out of your investments with multi-functional attachments
Any fleet owner should think about buying specialist blade attachments for their compact excavators. The “one machine, many jobs” mentality helps you get a good return on your investment (ROI).
The tiny excavator does all the work: the prep, the dig, and the finish. You don’t have to hire a separate grader or skid steer. This cuts down on transportation expenses and the hassle of having to deal with many operators at the same location. Also, being able to “clean up” as the process goes on makes sure that the site always looks safe and professional.
- Lower labor costs: One operator can accomplish the job of four ground crew members in a fraction of the time.
- Gasoline Efficiency: A smaller, more compact equipment for grading uses a lot less gasoline than a full-sized dozer.
- Transportability: Most small excavators with blades can be hauled on a regular trailer, so they may be quickly sent to many locations in one day.
Taking care of and maintaining for long-lasting performance
A regular maintenance program is a must if you want your mini excavator’s blade attachments to keep working at their best. The cutting edges will wear down over time since these blades are always in touch with rough materials like rocks, sand, and clay.
It’s also very important to check the pivot points and hydraulic hoses on a regular basis. This is because the “angle and tilt” operations exert certain demands on the hydraulic system. A well-maintained blade not only works better, but it also preserves the machine’s hydraulic health by making it easier to move.
- Grease Pivot Points: Lubricating the angling and tilting pins every day keeps them from rubbing against each other and becoming stuck.
- Check the cutting edges: Before the wear gets to the primary moldboard of the blade, flip or replace the bolt-on edges.
- Check Hydraulic Lines: Check the hydraulic lines for evidence of leaking or wear, particularly around the pivot points where the hoses are moved around a lot.
Questions About Mini Excavators’ Blade Attachments
Is it possible to add an angle blade to a small excavator that already has a straight blade?
Yes, in a lot of circumstances. Some blades are built into the frame, but there are also aftermarket blade attachments that may be added to small excavators. But this usually means installing extra hydraulic lines to the front of the machine to power the angling cylinders.
What makes a grading blade different from a grading bucket?
A grading bucket is connected to the end of the arm (the stick) and is used to scoop and smooth out small areas. A grading blade is attached to the bottom of the machine and is used to push bigger amounts of material and keep the machine stable.
How can I utilize the “float” feature on my excavator blade?
To turn on the float feature, you usually have to press the blade control lever all the way forward until it clicks into place. This lets the hydraulic pressure go down, which lets the blade go up and down freely depending on how hard the terrain is.
Is it worth it to pay more for a 6-way blade?
A 6-way blade is well worth it if you need to do precision grading, sloping, or making drainage swales. It has the tilt feature that lets you make exact angles that a conventional 4-way blade can’t.
Is it possible to use a tiny excavator blade to clear snow?
Yes, attachments for small excavators with blades are great for cleaning narrow roads and sidewalks. With an angle blade, you may easily push snow to the side without having to use a separate plow vehicle.
Will pushing big loads with the blade hurt my excavator?
Mini excavators are made to push things, but you shouldn’t “slam” the blade into anything. The goal is to keep the pressure constant and consistent. Make that the blade is the right size for the weight class of your machine.
How frequently do I need to change the cutting edge of my blade?
This depends on what kind of soil it is. You may have to flip or change the edge every 200 to 500 hours if the soil is rocky or rough. It might survive a lot longer on soft loam. If you see “crowning” in the middle of the blade, it’s time to make a change.

A trailer running at its weight limit continuously leads to accelerated tire wear and premature brake failure. Always choose a trailer rated at least 20% above your loaded machine weight.
Always calculate your TYPHON's wet weight — with fuel, hydraulic fluid, and a full tank — before purchasing a trailer. Dry weight figures from spec sheets are commonly 8–12% lower than the real transport load.
"The right trailer is not an accessory — it is the foundation of a safe, legal, and efficient job site operation for any TYPHON mini excavator owner."